Digital Accessibility Interventions for STEM-specific Teaching and Learning
The use of symbols, special notations, and equations is essential for precisely communicating many ideas in the mathematical sciences. This resource is meant to support faculty and instructional staff as they help students master the symbols, notations, syntax, and other components of equations vital for STEM disciplines.
Accessible Equations for Multiple Applications
Best practice for presenting accessible equations is for the equations to be typed natively within the platform. This guide includes information on typing equations within the package for several commonly used and University support tools. Equations can often be entered using an equation editor which provides a graphical user interface for selecting equation elements as well as directly using LaTeX code if preferred. Even for simple formulas, it is best to use an equation tool instead of just the superscript and subscript so that the content is read as a formula. Sometimes it is necessary to present STEM content with handwritten formulas, graphs, diagrams, videos, or other inherently visual mediums. Best practices for making these as accessible as possible follow at the end of this guide.
A Note for Getting Started
It is important to bear in mind that when using equation editors, you might want to consider adjusting your device settings. Frequent users of LaTeX and other equation packages note that these interfaces often appear with text that is small and difficult to see. Increasing the default display sizes or familiarizing yourself with how to easily zoom in and out for your display could be a good step to explore before you attempt to use any of the suggestions below. Consult the resources below for how to make scaling and zoom adjustments:
Additionally, if you are unfamiliar with LaTeX, you can familiarize yourself with the basics and experiment using a test environment using the resources below:
CarmenCanvas
Carmen offers a few options for entering equations. In the sections that follow, you’ll gain a brief introduction into where to find these tools and a summary for using them.
Canvas has an integrated tool for math and science formulas based on LaTeX. The LaTeX Equation Editor is built into the Rich Content Editor (RCE). You’ll be able to find this in several locations, including Announcements, Assignments, Discussions, Pages, Quizzes, and Syllabus.
To use this tool:
- Open the RCE when creating or editing an announcement, assignment, discussion, page, quiz, or syllabus.
- Click on “Insert” from the menu at the top of the RCE, then from the drop-down menu that appears, select “Equation.” Note: You can also access this by clicking on the equation icon that appears after you click on the three-dot more options menu. This icon looks like a square root symbol with an x under it.
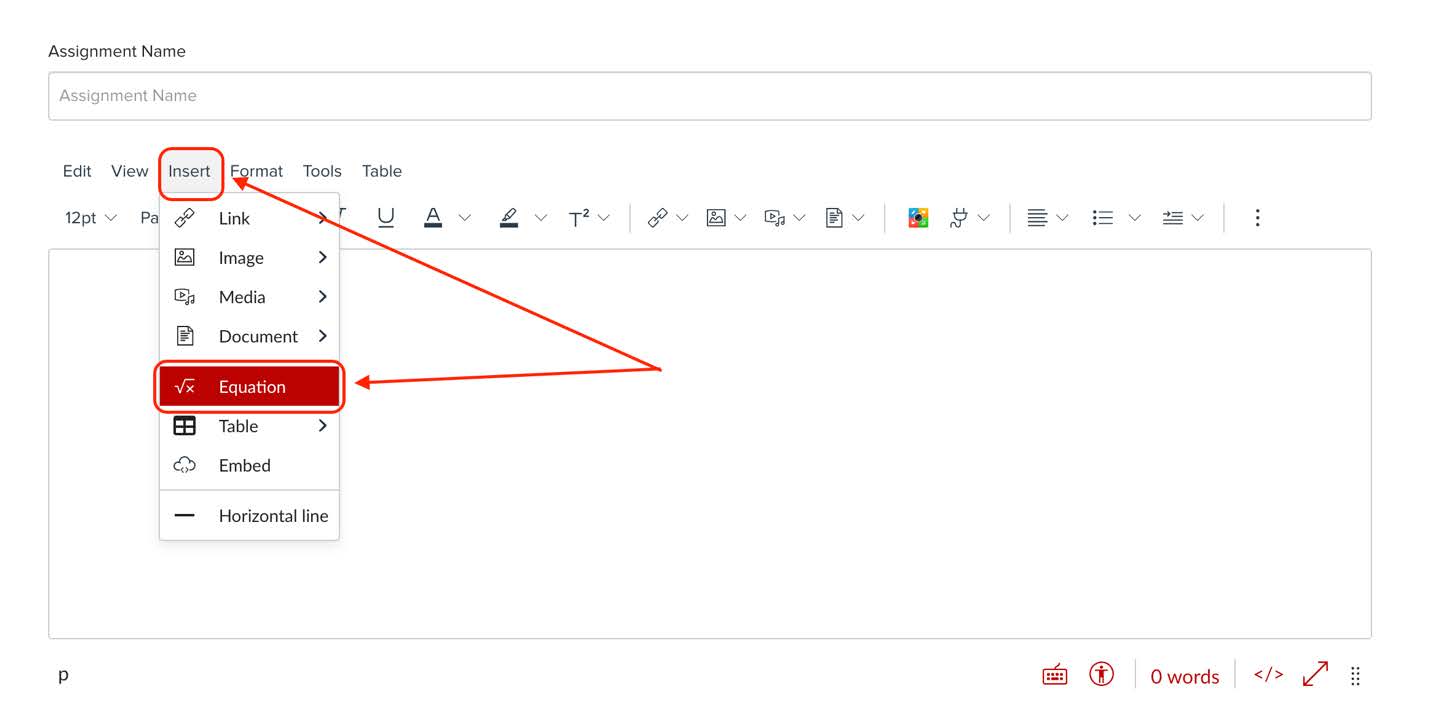

Once this is open, you have a couple options:
- The Equation Editor provides a toolbar for inserting various operators and symbols. By default, the toolbar displays the Basic tab. To access other operators and symbols, click any of the following tabs:
- Greek
- Operators,
- Relationships,
- Arrows,
- Delimiters, and
- Misc.
- You can enter expressions in the equation field directly. You can view and edit or hide the LaTeX code behind an expression by toggling “Directly Edit LaTeX” to the on position. Note: if you are looking for a guide to using LaTeX, there is a link to one that includes specific advice for use in CarmenCanvas.

Be sure to click the “Save” button when you are done.
Note about special characters:
To have characters #, $, &, ^, and _ appear in the Rich Content Editor when your equation is inserted, you must type a backslash (\) before the character. The ~ character can be inserted by typing \~~.
LaTeX can now be put anywhere there is a RCE in Carmen, including titles, calendar events, etc. It also works in New Quizzes and converts over from Classic Quizzes seamlessly. Equations can appear either inline or as display equations. Inline equations will appear within a line of text such as a sentence or paragraph, while display equations will appear one a separate line of their own with white space surrounding so that they stand out..
Basically, "\(EquationCodeHere\)" makes an inline equation and "\[EquationCodeHere\]" or "$$EquationCodeHere$$" makes a display equation. Here are examples of basic code you could now type directly in a text box in Canvas:
- Inline: \(A = \int_{a}^b f(x)dx\)
- Display mode (option 1): \[\frac{1}{x}]\
- Display mode (option 2): $$\frac{1}{x}$$
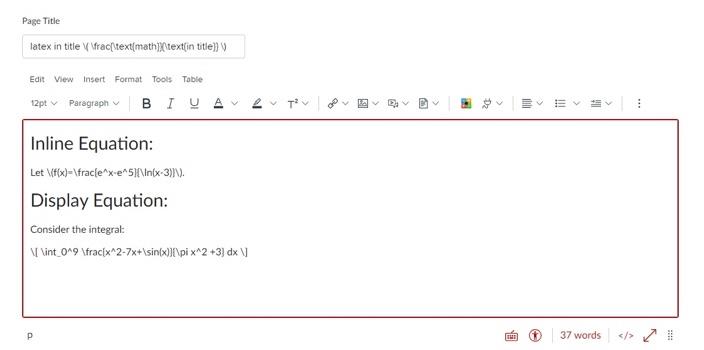
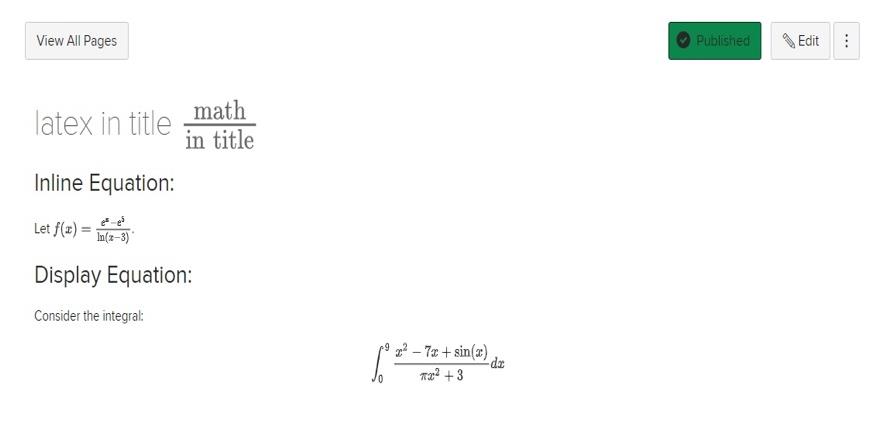
Note:
There is one minor limitation in Carmen to be aware of as you are composing LaTeX. If you are used to writing LaTeX using $EquationCodeHere$ to make an inline equation, this will not work in Carmen since it does not recognize single dollar signs for inline math mode. For example, when attempting to insert $\frac{5}{x}$, this will not compile. Instead, you need to enter \(\frac{5}{x}\).
Note:
Whether you are using the Equation editor or entering LaTeX directly in the RCE, you can modify or resize your equations easily if you are a Mac user (resizing equations will not work for PC/Windows users). To resize or edit a math expression, enter edit move and click on the equation to view the edit controls. To resize the expression, hover the cursor over a resize handle (which appears at the edges of a light blue box around the equation), click, and drag to a new size. To re-open the Equation Editor and make edits, click the Edit Equation link that appears when you click on the equation.
Here at Ohio State, you also have the option to access the WIRIS Equation Editor in Carmen. Using this tool, you can type mathematical notation in Canvas with the MathType plugin. Additionally, ChemType is a version of MathType designed to help you work with chemical notation. It includes a personalized toolbar with the common chemical symbols, as well as a different user experience adapted to chemical notation needs.
To access the MathType or ChemType equation editors:
- Open the RCE when creating or editing an announcement, assignment, discussion, page, quiz, or syllabus.
- From the RCE’s top menu, click on the small plug icon. A single drop-down item will appear reading “View All.”
- This will open a pop-up box. Scroll until you see “Insert Math Equation – WIRIS editor” or “Insert Chemistry – WIRIS editor.” Click on whichever option you need.
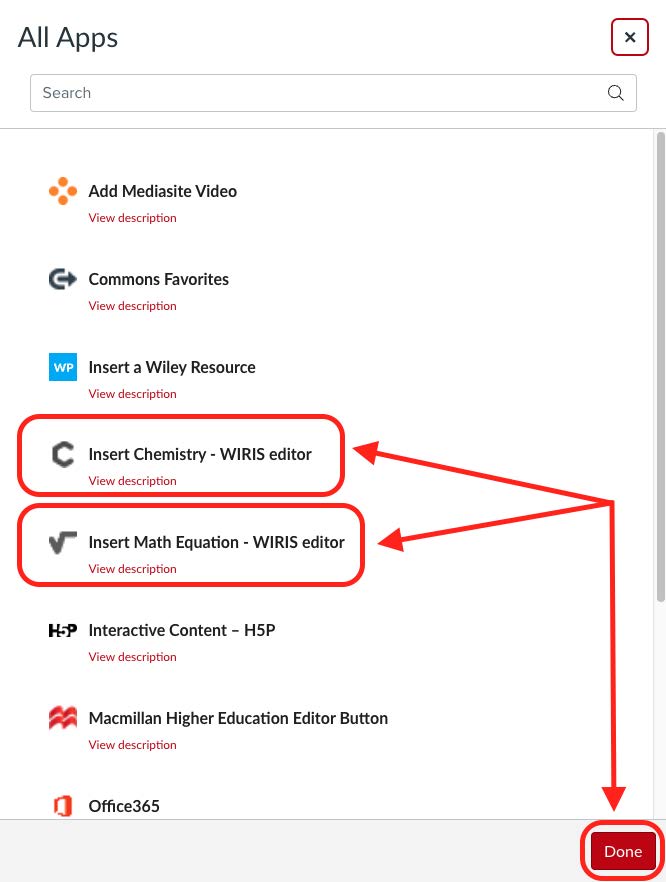
These equation editors offer many options to explore and use. Once you have built your equation, be sure to click “Ok” to insert the equation.
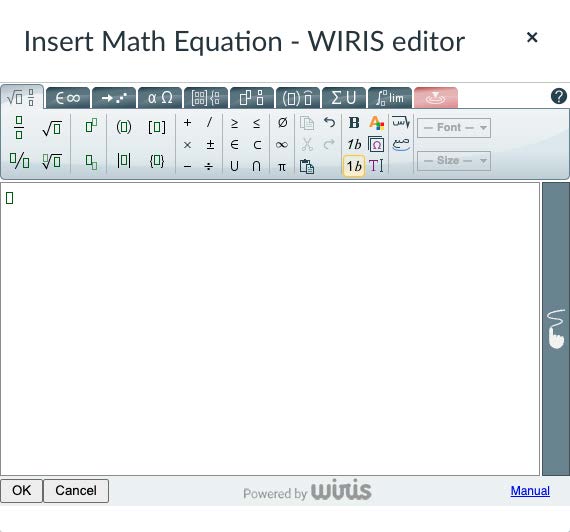
Note:
Once you have opened the MathType or ChemType editors once, these will appear in the drop-down menu when clicking on the plug icon in the future while using the RCE in any item in Carmen.
There are some additional items to be aware of if you are still using Classic Quizzes in Carmen. When creating a question, equations inserted using LaTeX don’t render in edit mode but do render in Preview mode within Student View.
Further, some question types in Classic Quizzes do not support the equation editor, such as answers in the Multiple Dropdowns question type.
This means that you should test in Preview and Student View to ensure your equations are displaying as you expect.
More information about supported LaTeX and specific guides for basic and advanced equation editor tips can be found using the links below:
- Canvas Equation Editor Tips: Math Equations
- Canvas Equation Editor Tips: Chemistry
- MathJax: TeX and LaTeX support: MathJax is an open-source JavaScript display engine for LaTeX, MathML, and AsciiMath notation that works in all modern browsers.
- Overleaf: Additional LaTeX support: Overleaf is a collaborative cloud-based LaTeX editor used for writing, editing and publishing scientific documents.
Microsoft applications (Word, Excel, PowerPoint, OneNote)
For learning materials that you will create containing large amounts of equations or which students will need to access outside of Carmen, Microsoft tools are generally the preferred option. Follow the steps from the guides below for each tool.
Note:
Frequent users of equation editor packages like LaTeX report that the equation editing capabilities in Microsoft applications can be difficult to use, particularly for complex mathematical expressions.
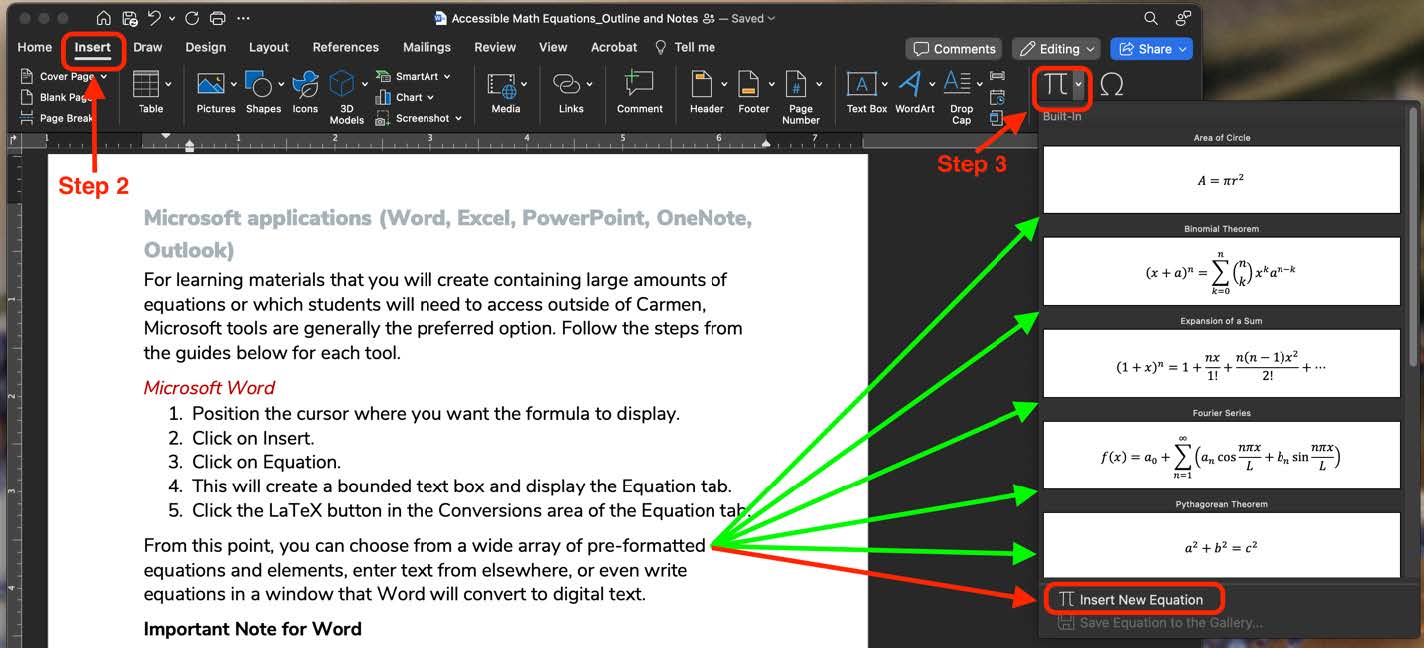
- Position the cursor where you want the formula to display.
- Click on Insert.
- Click on Equation. Note: You can also use the keyboard shortcut “Alt” + “=” for PC or “control” + “=” for Mac to bring up the Equation Editor.
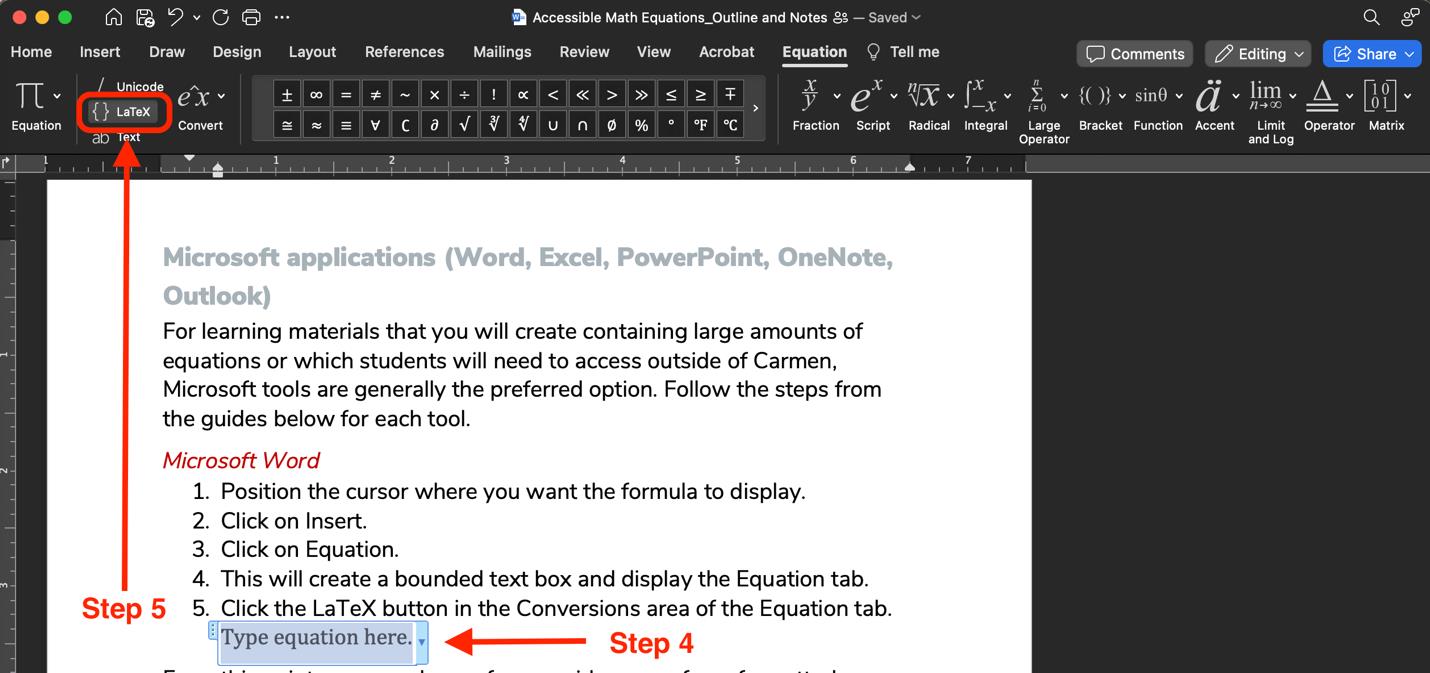
- This will create a bounded text box and display the Equation tab.
- From this point, you can choose from a wide array of pre-formatted equations and elements, or
- You can click the LaTeX button in the Conversions area of the Equation tab if your preference is to write LaTeX.
Important Note for Word:
If you are using an earlier version of Word from 2018 or before, the Equation Editor (Microsoft Equation 3.0) has been replaced with a new equation editor. Users who try to edit an equation created in Equation Editor 3.0 will receive the error message "Microsoft Equation is not available." Equation Editor 3.0 objects will still display normally if you have MT Extra font installed. However, users can edit these equations only by downloading the MathType software tools that are provided by WIRIS. NOTE: This is a software integration that has not been reviewed for use in Microsoft products at Ohio State. If you are interested in pursuing review for WIRIS in Microsoft products, you can learn more about this process by referencing the article linked here.
If you follow the steps 1-3 above from the Microsoft Word guide, you will have the ability to input some preformatted equations and formulas and edit as you need from there.
Select the dropdown heading concerning “LaTeX equation editing examples.”
- Selecting Insert from the top menu, then Equation (in the desktop app) or Math Assistant (in the browser version) from the ribbon (or access via the keyboard shortcut “ALT” + “=” for PC or “control” + “=” for Mac).
- Type or write your equation on a page.
- Select the equation using your keyboard or cursor and click the Math button to convert your equation to a digitally accessible version.
More information about using the Math Assistant in OneNote is below under “Tips for Increasing Accessibility.”
Tips for Increasing Accessibility
Handwritten Notes, Images, and Videos
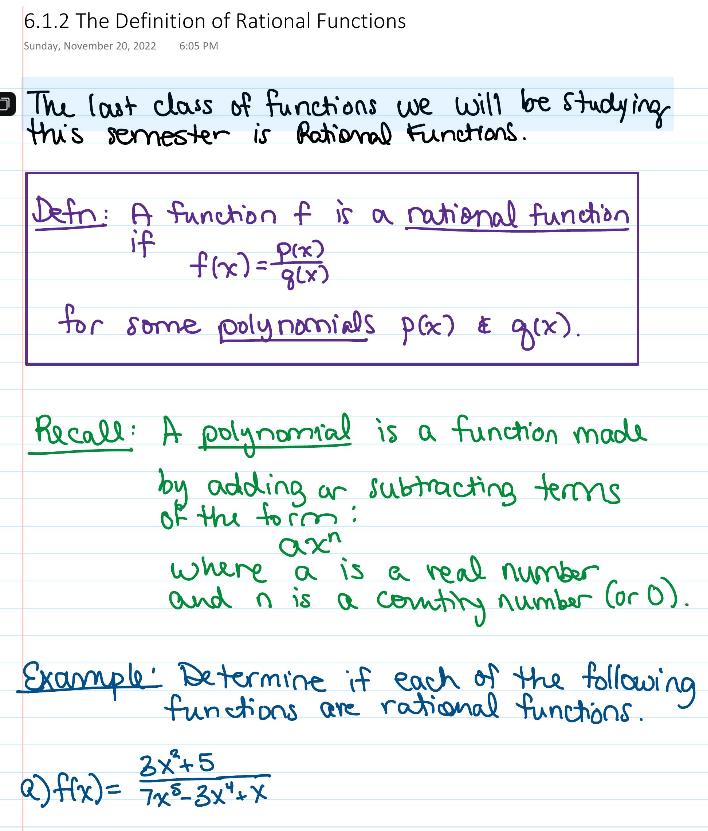
In addition to the textual representation of mathematical and scientific equations, visual depictions of such textual forms are also important for understanding concepts and complex problems pertaining to STEM fields. Providing digitally recorded handwritten depictions of the processes involved in solving a complex problem, or offering visual graphs and charts alongside textual equations, can greatly help to increase access to and understanding of the materials, providing learners with additional time and pathways they may need for comprehension.
At the same time, however, such visualizations are not inherently accessible for all learners and may require a few additional steps to ensure access and inclusion for as many learners as possible. Below are just a few general tips and strategies to keep in mind as you consider ways of improving accessibility in your courses.
While digital representations and primarily visual learning materials can create barriers for screen readers and learners with other vision impairments, the ability to provide alt text for this type of dynamic learning material is often not feasible for many instructors due to time and capacity constraints. But there are a few additional practices you might consider that can help to improve accessibility for your learners.
We recommend using the university-supported tool Microsoft OneNote to capture handwritten materials. OneNote contains several accessibility features that can be used to make relatively immediate improvements.
Narrate as you write to auto populate text transcripts for learners: To record your narration, there are a few tools within OneNote you can use: Dictate, Audio, or Transcribe (if working within the desktop app on a PC). Each of these tools allows you to record your lesson with your device’s microphone. The Dictate tool will auto populate text of your recordings directly on the page. The transcribe functionality allows you to record lengthier narration and generate a text transcript in a side panel. The Audio feature allows you to record lengthier sessions, but does require you to download and save the audio file to your device in order to generate a text transcript using an external tool, such as Microsoft Word’s web browser application or Mediasite (see the ASC ODE resource “How to Generate Text Transcripts for Existing Audio-Only Files).
Use the Math Assistant to quickly convert handwritten equations to text: The web browser version of OneNote provides access to a tool called Math Assistant. You can use this tool to quickly convert handwritten equations to text.
To do so:
- Click Draw from the main toolbar.
- Select the Lasso Select tool.
- Click within the notebook page and highlight any handwritten formulas you would like to convert.
- With the Draw menu still open, click the Math Assistant tool. A preview of how the application is interpreting the written text will appear in a preview frame to the right of your screen.
- Use the Fix it option just below the preview frame to make any necessary corrections and then click the Ink to Math link to finalize and convert your handwriting to text.
We want to note that while this process gives an opportunity for working with accessibility features that support the generation of accessible equations, this is likely not the most practical or expedient option. We appreciate that speech to text does not always work well in technical disciplines and the conversion tool for handwriting to typed math do not always reliably produce usable conversions. While this may mean that it is faster to type the equations manually, we are hopeful that tools like this and others will update to make these features more robust in the future to meet user expectations.
As with any field of study, particularly in an online course, the inclusion of images and videos to present and support learning materials are necessary both for pedagogical and engagement purposes. Much like the practice of digital handwriting described above, however, these visual formats can create barriers for some learners in the absence of additional support mechanisms.
As you consider presenting images and video files within your courses, here are a few accessibility strategies and best practices you might consider to improve the overall learning experience.
Use Desmos to present graphs and other visualizations. Desmos Studio is a Public Benefit Corporation that provides free and open access to various math tools, including a graphing calculator. The visualizations generated by Desmos are designed to be accessible for a variety of learners. See the ASC ODE resources Desmos: An Easy and Powerful Online Tool for Graphing and Visual Representations of Mathematics and Desmos Classroom: A Powerful Free Way to Build interactive and Social Graph-based Assignments.
Provide alt text and captions for images. When incorporating images that are informative, instructional, or aesthetic, it is important to include alternative attributes that can help various devices identify these content elements. These might include providing alternative text, detailed image captions and/or descriptions that provide context for more complex visuals or marking the image as decorative for images that do not require further contextualization to provide a co-equal learning experience for all students. For more information and guidance, see the ASC ODE resource on Composing Accessible Alt Text.
Include captions and transcripts for videos. As with images, providing additional attributes such as captions and text transcripts can greatly improve the learning experience and general access to these multimedia materials for a variety of learners. Captions and transcripts may be necessary for those who are deaf or hard of hearing but can also benefit learners who may be working in a noisy environment or ESL learners who may benefit from the support offered via written text. Both Mediasite and Microsoft Stream offer options for automatically generating and downloading both captions and transcripts.
Turn images and videos into interactive media with text labels and description tags. For more complex graphs, charts, and other data visualizations that contain a variety of text or that depict a wealth of information, consider utilizing an ASC-supported tool like ThingLink. With ThingLink, you can upload an image of your visualization and add clickable, accessible tags that contain textual information (see example below). These text labels and descriptions can then be chunked into smaller segments and directly associated and linked to key points within the image, functioning as a sort of targeted image caption. Likewise, for videos that present similar types of visual depictions, these same types of clickable tags can be added atop the video and set to appear at specified moments within the timeline, serving as an additional support and supplementing the existing video captions that may not otherwise capture all the details of the visualizations presented. For more about ThingLink, see the ASC ODE web resource ThingLink: An Interactive Tool for Instructors and Students.
Additional Resources and Support
In addition, if you are looking for some more support resources for creating accessible content, we’ve compiled some that you can peruse:
How to Generate Captions and Transcripts for Video and Audio-only Files
Digital Accessibility Services: this university-wide service unit under the umbrella of OTDI provides resources and assistance to those producing digital content. They have several excellent resources and trainings for producing accessible digital content. Some of the most helpful are listed below, but the link at the start of this bullet point will take you to the resource landing page where you can explore all the trainings and guides that they offer:
Microsoft Office Document Accessibility (includes trainings for Word, Excel, and PowerPoint)
The instructional designers in ASC ODE are trained in ensuring accessibility in digital and online learning materials and can also advise on ways to address student needs through more extensive redesign using frameworks such as Universal Design for Learning (UDL) and User Experience Design for Learning (UXDL). You can request a consultation with a member of our team using this online form.
Several departments and areas within the college support teams and individual staff who provide discipline-specific support for instruction. Their expertise encompasses accessibility, and they can be an especially valuable resource for specific challenges peculiar to specific subjects. Consult the list of support professionals below to help identify the individual that might best be able to serve your needs:
- Elizabeth Miller, Senior Math Instructional Design Technician: elizmiller@math.osu.edu
- Terry Bradley, Systems Manager, Physics: bradley.77@osu.edu
